Caveat: I never had any formal training in any form of weaving. This is what I learned from experience and random websites. My main inspiration for weaving was/is the website of Marla Mallet, but the piece I did recently was done without looking again at it first, and it shows.
I know the real weavers will probably cringe at this, it is not supposed to be a surrogate for real weaving on a loom, just a way to make tiny pieces of constructed fabric as you need them. It also lets you wild things that wouldn’t be possible on a real loom, but that would be for yet to write part 3. I think it isn’t more slow than cross stitch or needlepoint stitches.
You need:
– a piece of styrofoam or similar material big enough for the piece you want to weave
– normal tailor’s pins (lots of them)
– thin and sturdy thread for the warp (crochet cotton size 20 or something similar)
– any thread you chose for the weft (too bulky probably won’t work)
– a big, blunt embroidery needle
– for many weaving patterns you can use a shuttle if you have one, for others not
First, decide how big your piece is going to be, and draw it onto the styrofoam or onto a piece of paper you pin on top of it. If you want the ends of the warp form a fringe, then you have to add the length of the tassels to the length of your piece.
Then, put up the two rows of needles over which you put the warp. I like to space them so that I can do an evenweave using the warp yarn. I can always weave over more than one warp thread for other patterns. the needles should slightly lean away from the work so the warp won’t slip off them when manipulated.
Next, the warp is put on the needles. This is done using one continuous tread, simply run it to and fro, it goes arround the needles to be ancored on both sides.
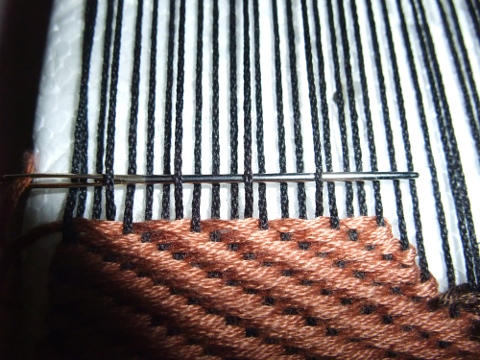
This shows the pin loom all set up (and the first few rows already woven).

When the warp is in place, you can start weaving. If you want a tasseled fringe simply start doing your pattern where later the fringe is supposed to end and the woven fabric should begin.
If not, you need to weave 3-4 rows in canvas binding (needle/shuttle over one thread, under one thread, over one thread…). Do this first thing on both ends of the piece, that will make the last few rows easier to do. Push those towards the needles as hard as you can. If you have done this you can take the finished piece off the loom without worrying about having it fall apart, and there’s no need to knot it off (there won’t be leftover warp thread for this anyway). If you don’t do that the weft rows will slip off the warp in the end.
If you have been planning for a fringe you need to knot it off like any woven fabric coming off a regular loom.

Now you are ready to begin weaving your desired pattern. Here I weave two over- two under – to produce plain weave that hides the warp completely.

The next picture shows canvas binding (one over,one under). It should be close to evenweave when well done.

The next one is done one under – three over – one under in one row, and in the next basically the same just offset one thread, so the next row would be one over- one under -three over – one under and so on.

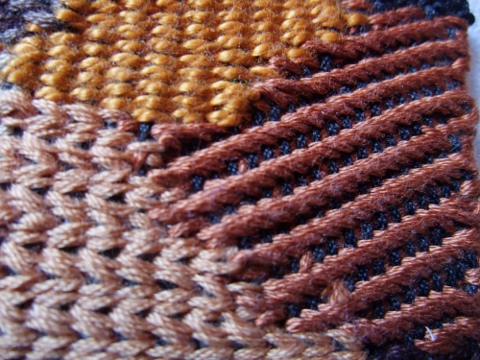
One under, two over, one under – the same one tread offset in the next row; the classical twill pattern. (light beige and dark brown patches)

two under, tree over. two under, offset one thread in the next row. For more broad diagonal stripes with the warp thread showing more clearly. (Reddish brown patch)

There are indefinite possibillities for constructing patterns just going under-over different numbers of threads in different rows. In this piece I have deliberately kept things simple because it is meant to show patches of soil and dirt. handweaving.net has a plethora of such patterns, and you can always make up your own, or google.
To all who worry about my haphazard working style: Part two is already written, I’ll post it soon. I could write more, about warp in more than one direction, and cardboard looms, but I should better get on with the stitch explorer challenge I think.
June 25th, 2009 at 9:00 pm
[…] for freestyle weaving on a pin loom. It’s over on Tenar’s Cave blog, and it rocks. See the tute. SHARETHIS.addEntry({ title: "Tutorial: Freestyle weaving", url: […]
LikeLike
June 25th, 2009 at 10:00 pm
This is pretty awesome – perfect for creating a woven accent for an artist trading card, I think, or even to make inchies. I’m looking forward to trying this.
LikeLike
June 26th, 2009 at 6:10 pm
I can see this technique creating motifs for crazy quilts, too.
Just superb…thank you so much!
LikeLike
June 27th, 2009 at 11:22 am
This is ingenious and I want to start weaving immediately. I am a conventional weaver who needs some added inspiration, and this is it! Thank you SO much
LikeLike
September 13th, 2011 at 5:08 am
[…] anything- just weaving. Here are some links to get you started: Freestyle Weaving Cardboard Loom Pin Loom Simple Frame Loom Picture Frame Loom Simple Frame Loom Frame Loom PVC Pipe Loom So if you are […]
LikeLike
November 12th, 2016 at 2:07 pm
[…] Tenar72.wordpress.com – Home Made Pin Loom […]
LikeLike