Tag Archives: needleweaving

Freestyle Weaving Tutorial Part 6: Going Wild with Weaving

For the time being, this is the sixth and last instalment of my tutorial series on needleweaving. See my page all about needleweaving for links to the first 5 parts and related stuff.

One of the most beautiful aspects of needleweaving is that the warp doesn’t need to be straight. Here I show how to do a piece with circular warp, but it can go any direction. Also, the cardboard frame and therefore the shape of the finished piece can be any shape.

I have been using the same cardboard frame I used for my last piece. Here you see the circular warp anchored in the backstitches at the sides.

Fix the warp in place by weaving arround the middle a few times.

At the bottom of the piece, I added straight threads. They will act as warp, so the weft will go up and down not from right to left in this area. I wove those threads into the spiderweb. All layers should be interwoven so that the finished piece won’t fall apart.

Next I started weaving the black frame. You don’t need to do such a frame, I wanted it for the look. About one centimeter should be done in canvas binding arround the whole piece for stability, but this can be done using the normal working threads as well, especially when these borders will be hidden in the finished article.

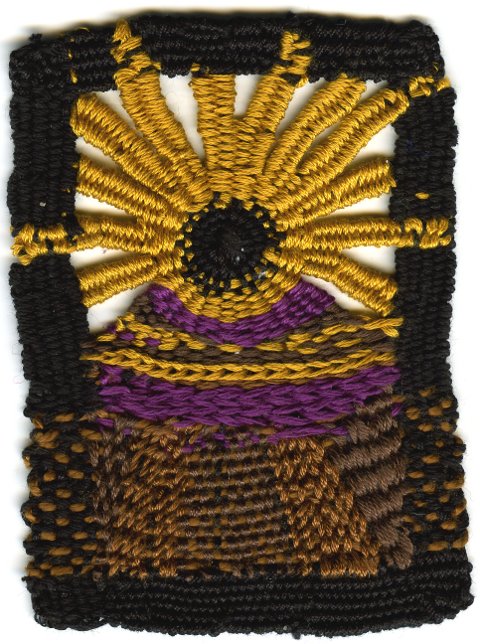
The middle of the spiderweb was not filled with circular weaving, I wove spokes which are meant to be sun rays. Note how some on them project into the border. The black border was woven at the same time in these places.

The finished Piece. Note the weaving direction in the part representing the ground. It goes up and down over the secondary warp in brown thread. The violet and yellow above the brown soil was woven to and fro into the warp coming from the spiderweel.


Freestyle Weaving Tutorial Part III: Different Colours

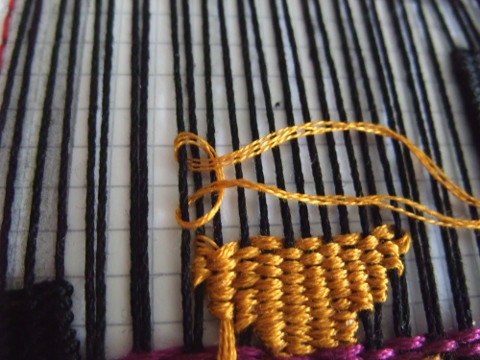
First, I want to show you another method of starting threads that I found in this tutorial. Split the tread in two parts for this if possible or use a thread you can use double. fasten it arround a warp thread with a slip knot.

slip-knot

Another remark: Diane suggested in a comment to ue plastc canvas as a loom, just anchor the warp threads in it and cut it away when you’re done. Thank you Diane, sounds like a good idea to me (or would, if plastic canvas was common here).

In my previous works woven on improvised looms you have probably seen many areas of different pattern side by side. Here I show how this is done as best as I know.

The first method is the slit weaving method. You simply turn where one colour ends and weave back and forth in the intended shape. The adjacent shapes are done the same way, so that slits form between colour areas. This is more difficult than it looks. If you pull the warp together just a little bit while weaving the slits will become ugly holes. Also, the pattern should be designed for this to avoid really long gaping slits.
The advantage of this is that the borders between colours are very clearcut. This is usually used in traditional Kelims.
In the piece I show, one side of the round whape is strictly slit weaving, on the other I cheated because the thing was slightly pulled out of shape.

slit-weave

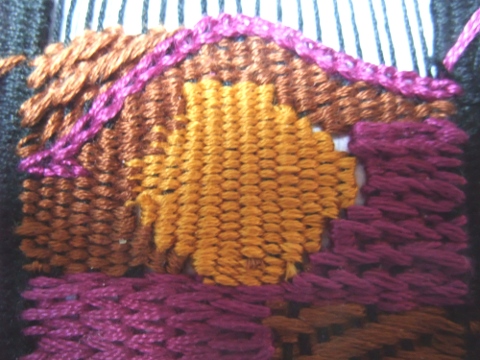
The next method is called dovetailing, and is imho the easiest and most versatile one. The two areas in different colours share one warp thread at the border. With a needle, you can weave one shape first and add the adjacent one as shown in the photograph. With a shuttle or something similar you will have to weave both shapes simultaneously, alternating between colours.
You can use this when the two threads are different in gauge, just weave arround the shared warp thread where it seems appropriate, not strictly after every thread of the first shape.

dovetailing

The next method is interlocking. With a needle, thread the the weft of one shape through the loop the weft of the other shape has formed when turning, you can pick up the warp thread either or not as it suits you. With shuttles, weave the two shapes simultaneously and wrap the two threads arround each other where they meet.
This will only work well when using same gauge thread and a similar weaving technique for both pieces, but then it can look more cleanly than dovetailing.

interlocking

The last technique would be brocading, but i have never done this myself. In this technique, you use 2 or more differently coloured weft threads simultaneously and alternate between them leaving floats either on the backside or on the front side, comparable to fair isle knitting. This technique is suitable for conventional western looms and can be done by machines easiely. I’m not sure about the other techniques.

The other 3 techniques are mainly used in folk craft, for example slit weaving in oriental kelims, dovetailing or interlocking in Navajo rugs. These are usually done on vertical looms, without combs and heddles as we know them from conventional western looms, more often than not even without shuttles or needles.


Freestyle Weaving -Tutorial part II: Cardboard Loom

Ther is another method to achieve pretty much the same as shown in the first part, I’m showing you this first before going into advanced weaving techniques. I’m calling it a cardboard loom. In the old needlework books, this is touted as a the way to do teneriffe lace (which is basically needleweaving in the round) and a very similar process is used for regular needlelace.

I am trying to keep further instalments of this tutorial series a bit shorter than the first for the sake of people with slow connections. I hope you don’t mind.

You need:
– two pieces of cardboard or thick, stiff paper
– Gridded paper, or epuipment to draw your own grid on the cardboard
– Sturdy thin sewing thread (buttonhole machine thread woll do fine)
– Some thread or yarn suitable as warp (preferrably somewhat sturdy)
– a sharp needle and optionally a pricker or a timble
– Any threads you want to use for the actual weaving
– A (blunt) tapestry needle for weaving

card-loom1

Draw the outline of the finished piece onto the gridded paper, and if you want the design. Put all three layers together. Now you need to sew backstitches arround the whole outline. One back stitch means two warp threads, chose the distance between them accordingly. Use the gridded paper to make the distances evenly. This is much easier if you pierce the layers first with a small pricker or a slightly bigger sharp needle using a timble. Next you can thread your loom like you would do with a pin loom, lacing the warp thread through the back stitches.

card-loom2

Closeup to show the treading process.

card-loom2b

Now you are ready to start weaving. The first and last 3-4 rows need to be woven in canvas binding (one over, one under) to keep the finished piece from falling apart. At the sides you pick up the backstitches together with the last warp thread, that will keep you from pulling the fabric out of form.

card-loom3

When you are all done, you insert a sharp letter opener or kitchen knife between the two cardboard layers and cut them apart. Your finished work should fall off them then, all you have to do is pick the remnants of the backstitches out of it and hide all the loose thread ends.

The advantage of this method over the pin loom is the fact that it is highly portable, you can carry it in your purse and work on it whenever you find time. Also, the fabric isn’t easiely pulled out of shape because you can anchor it in the backstitches at the sides.
The disadvantage is that it takes much more time to set up than a pin loom.


Freestyle Weaving – Tutorial Part 1: Pin Loom

Caveat: I never had any formal training in any form of weaving. This is what I learned from experience and random websites. My main inspiration for weaving was/is the website of Marla Mallet, but the piece I did recently was done without looking again at it first, and it shows.

I know the real weavers will probably cringe at this, it is not supposed to be a surrogate for real weaving on a loom, just a way to make tiny pieces of constructed fabric as you need them. It also lets you wild things that wouldn’t be possible on a real loom, but that would be for yet to write part 3. I think it isn’t more slow than cross stitch or needlepoint stitches.

You need:
– a piece of styrofoam or similar material big enough for the piece you want to weave
– normal tailor’s pins (lots of them)
– thin and sturdy thread for the warp (crochet cotton size 20 or something similar)
– any thread you chose for the weft (too bulky probably won’t work)
– a big, blunt embroidery needle
– for many weaving patterns you can use a shuttle if you have one, for others not

First, decide how big your piece is going to be, and draw it onto the styrofoam or onto a piece of paper you pin on top of it. If you want the ends of the warp form a fringe, then you have to add the length of the tassels to the length of your piece.

Then, put up the two rows of needles over which you put the warp. I like to space them so that I can do an evenweave using the warp yarn. I can always weave over more than one warp thread for other patterns. the needles should slightly lean away from the work so the warp won’t slip off them when manipulated.

Next, the warp is put on the needles. This is done using one continuous tread, simply run it to and fro, it goes arround the needles to be ancored on both sides.

This shows the pin loom all set up (and the first few rows already woven).

pin-loom1-vw

When the warp is in place, you can start weaving. If you want a tasseled fringe simply start doing your pattern where later the fringe is supposed to end and the woven fabric should begin.
If not, you need to weave 3-4 rows in canvas binding (needle/shuttle over one thread, under one thread, over one thread…). Do this first thing on both ends of the piece, that will make the last few rows easier to do. Push those towards the needles as hard as you can. If you have done this you can take the finished piece off the loom without worrying about having it fall apart, and there’s no need to knot it off (there won’t be leftover warp thread for this anyway). If you don’t do that the weft rows will slip off the warp in the end.
If you have been planning for a fringe you need to knot it off like any woven fabric coming off a regular loom.

pin-loom2-vw

Now you are ready to begin weaving your desired pattern. Here I weave two over- two under – to produce plain weave that hides the warp completely.

pin-loom4-vw

The next picture shows canvas binding (one over,one under). It should be close to evenweave when well done.

eavenweave

The next one is done one under – three over – one under in one row, and in the next basically the same just offset one thread, so the next row would be one over- one under -three over – one under and so on.
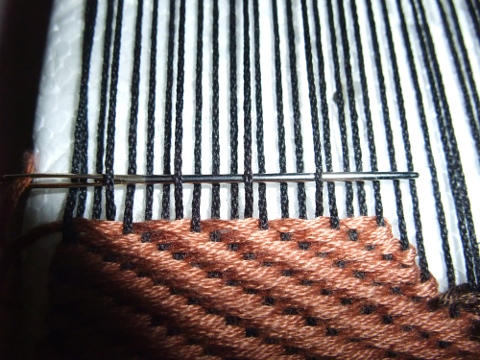
pin-loom3-vw

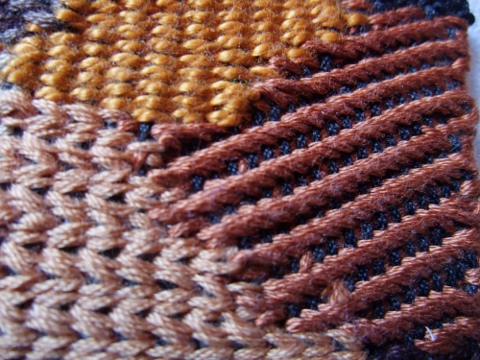
One under, two over, one under – the same one tread offset in the next row; the classical twill pattern. (light beige and dark brown patches)

pattern2

two under, tree over. two under, offset one thread in the next row. For more broad diagonal stripes with the warp thread showing more clearly. (Reddish brown patch)
pattern3

There are indefinite possibillities for constructing patterns just going under-over different numbers of threads in different rows. In this piece I have deliberately kept things simple because it is meant to show patches of soil and dirt. handweaving.net has a plethora of such patterns, and you can always make up your own, or google.

To all who worry about my haphazard working style: Part two is already written, I’ll post it soon. I could write more, about warp in more than one direction, and cardboard looms, but I should better get on with the stitch explorer challenge I think.


Needleweaving in my Assisi Embroidery

This is a little part of my assisi embroidery. I have used needlewoven bars wildly crossed to add to the general encrusted look. I’m rather pleased with this, and I think it is easier done than tons of french knots and buillon stitches. (although I’m afraid of the latter no more after this piece)

assisi-nw

This is a turk’s cap lilly from my garden. They take 5 years from seedling to the first flowers, so I treasure them very much. I like them more than most of the big colourful everyday garden flowers.

tuerkenbund